ss_blog_claim=1aad29784d22b656dd0fe759da065d26

Broccoli and Cauliflower Salad

This is a great summer salad for BBQs or camping. It can be made ahead and keeps for a couple of days. The ingredients can be bought at a local farmer's market for the freshest taste.

Let's get started shall we?

INGREDIENTS

  • 1 cup broccoli florets
  • 1 cup cauliflower florets
  • 1 cup shredded Cheddar cheese
  • 6 slices bacon
  • 1 cup mayonnaise
  • 1/2 cup white sugar
  • 2 tablespoons white wine vinegar

DIRECTIONS

  1. Place bacon in a large, deep skillet. Cook over medium high heat until evenly brown. Crumble and set aside.
  2. In a medium sized salad bowl, layer in order the broccoli, cauliflower, eggs, cheese and bacon.
  3. Prepare the dressing by whisking together the mayonnaise, sugar and vinegar. Drizzle dressing over top and serve.
Could it get any easier?


Technorati tags: , , ,

A Perfect Light

As I was driving to pick up my hubby from the airport this evening, I noticed how beautiful everything looks at dusk. I think it was especially pretty tonight because all day it had been gloomy and dark and rainy, then around 7 pm, the sun came out and the rain stopped. All the fields and trees were wet and the evening light just made everything sparkle and shine.

I've read and heard before that the best times of day to take pictures is at dawn and dusk, I kept this in the back of my head, and have taken pictures at these times before, but tonight, it really hit me. The light is absolutely perfect, bright, but not overwhelming like mid-day lighting can be. Everything has a beautiful glow to it, not washed out like during the bright sun of day.

I'd like to share a few pictures I've taken at dusk, and make a promise to myself to do it more often.


Photobucket

Photobucket - Video and Image Hosting


Photobucket - Video and Image Hosting


Photobucket - Video and Image Hosting


Photobucket - Video and Image Hosting


See how the light is bright, yet not harsh? The lighting is what makes these pictures so soothing and beautiful. Although, I'll admit, I may be a tad biased!

Technorati tags: , , ,

Flowers, flowers, flowers!

I absolutely love flowers, their smell, their beauty, and taking photos of them! For Mother's Day this year I received flowers from my two oldest children, albeit they were made from construction paper, from my dear husband, and from my mother!

I took pictures of my favorite ones that my hubby gave me and wanted to share them with you all!

Photobucket

Photobucket

Photobucket

Technorati tags: , ,

Works for me Wednesday-ING Direct


I have a bad habit of spending money if I have cash. I also tend to spend whatever I have available in my checking account, because it's easy to just hand over my debit card and go on about my business. Somewhere I heard that in order to save, you have to pay yourself first. However, if I put the money in my local bank savings account, it's all too easy to transfer that money over into my checking account when the need arises. Therefore, my savings account, does not have any savings in it. Kind of defeats the purpose right?

So what I decided to do was use a great resource, ING Direct. I can set up an account, but there is no ATM or debit card to allow me quick and easy access to the money. I can have ING withdraw a pre-determined amount from my checking account, however often I set it up to do so. I can now build a savings account, that I can only access if I log into the account and withdraw the money.

I chose to open an Orange Savings Account. This type of account matched what I needed the most. It offers high interest (3% APR), no service charge, and no fees. There are no minimum required balances, which is perfect for me, because I often have to pay $5 to my local bank for not having the minimum balance in my account. There is 24 hour access to my account, no need to change banks, PLUS, the Orange Savings Account is automatically linked to the checking account used for the initial deposit. This next part however, is what really got me!

Pay Yourself First!
The Automatic Savings Plan allows you to automatically have a fixed amount of money regularly transferred to your high interest Orange Savings from your linked checking account. You will be saving your money effortlessly and will have money for a rainy day or to achieve your dreams. You can either call us or set up your Automatic Savings Plan on this website. You specify how much money you would like transferred, and how often you would like it moved. This is the simple, easy way to really grow your Orange Savings Account.


How perfect is that? Just what I had been telling myself before I heard of ING Direct! Yay!

Another great benefit is that I can refer up to 50 people to ING Direct and both of us benefit. The person who signs up and makes an initial deposit of at least $250 will get an automatic $25 deposited into their account, that's a 10% return! Can't beat that. I will get $10 for each person referred who signs up, this is potentially $500 dollars for me.

If you're interested in a referral, please contact me and provide me with your email address. Thanks!

Cross posted at To Be Debt Free

Technorati tags: , , ,

Photography Basics: Window-light Portraits

Among the most flattering way to light people, window lit portraits require indirect sunlight. The best indirect light can be achieved using a North facing window. Remove anything distracting in the background, or hang a dark backdrop far enough behind the subject to prevent capturing its texture. Shutter speeds will likely be too long to handhold.

Every window has a sweet spot. Experiment with subject position relative to the window until light falls flatteringly on the face. Sometimes the best position is with the head slightly beyond or outsdie the window jamb, putting the window side ear in the shadow. With larger panes, the light can come from too high an angle, casting shadows from the nose, cheek, and chin. To avoid this, move the subject deeper into the room or pull down the shade to baffle the top light.

Now, build the pose. To put your subject's chest in shadow and highlight the face, place his back toward the window and shoulds angled to the glass. Then turn the head towards the light. Use a small reflector opposite the window and near the subject to fill the shadowed side of the face.

Start by capturing the full face, the try a variety of 3/4 views. For profiles, swing the shoulders parallel to the window.

Technorati tags: , , , , ,

Photoshop Trick: Macro Style

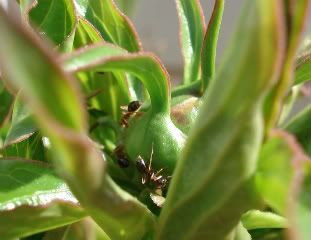
I haven't done a Photoshop post in a while, although I have a ton of photographs to work with! Sorry about that. For this tutorial, I used a recent picture I took of my peony, but I used the Macro setting on my camera to focus in on the ants crawling on the buds.

Here is the original (SOOC) picture.
Photobucket
The first step I took was to crop the picture to really focus the attention on the ants.
Photobucket
Next, I used the action, "Fresh & Colorful", from Pioneer Woman's Action Set.
Photobucket
Then, I applied the action, "Define & Sharpen", from the same set. This helps make the photograph "crisper", so to speak.
Photobucket
Then I simply flattened the image. Layer>Flatten Image, or PW provides a flatten action for the lazy folks, like myself!

The last step, was another action! This time I used the "Quick Edge Burn", it helps focus the eye onto the center of the photograph by creating a darker edge, or burn, around the edges.
Photobucket

Technorati tags: , , ,

Worm Dirt Cake

As I mentioned earlier this week, my oldest just turned 9! We had a small party for her over the weekend with friends and family out at Willow Bay. She had requested "Dirt Cake" and I found a fantastic recipe at Cooks.com, I think it turned out fabulously!

PhotobucketPhotobucket

WORM DIRT CAKE

1 to 1 1/4 lb. pkg. Oreo cookies
1 (8 oz.) pkg. cream cheese
1/2 cup butter, softened
1 cup powdered sugar
3 cups milk
1 (12 oz.) tub Cool Whip (can use chocolate)
2 (3 1/2 oz.) pkg. instant vanilla or chocolate pudding
1/2 tsp. vanilla
4 gummy worms and/or other critters

Crush Oreos. Put 1/3 of the crushed Oreos into a new, clean flower pot. Set aside.

Mix butter, cream cheese and sugar and vanilla together. Set aside.

Combine milk and pudding mix. Fold Cool Whip into the pudding.

Fold together pudding mixture and butter-cream cheese mixture.

Layer this mixture (about 1/3 of it) onto the crumbled cookies in the pot. Next, add another layer of Oreos, then another layer of the pudding mixture, then another layer of cookie crumbs, continuing until all ingredients are used.

As you're layering the ingredients, decoratively place several gummy worms and critters in the "soil" so they will be seen emerging. If you have a toy (clean) garden trowel, a plastic daisy, or some edible flowers, these can also be used creatively to embellish the presentation. (I used regular flowers, but first cut a straw in half and placed the stems into the straws).

Chill in refrigerator for 3 to 4 hours before serving.

Technorati tags: , , ,